In the recent blog post, The Most Common Technical SEO Issues, the importance of addressing page load performance was discussed. Now, we will dive deeper into one of the most common and easy to fix issues with page performance: images that are not web optimized. We will discuss what that means, why it is essential to address, and how to actually fix any issues.
What is a Web Optimized Image?
Have you ever downloaded from Google images, a stock image service, or even grabbed an image off your camera or phone and then uploaded that very image to your website? Well, congratulations, you have contributed to the bloat of the internet by uploading unoptimized images 😄.
Online stock image services, photo galleries, and even your camera present you with optimized images, but they are optimized to look great and show crisp detail at the cost of file size. That is perfect for those purposes, but we need to approach things differently when using it on a website competing for views and search engine results rankings.
For a web optimized image, we are concerned about making sure the picture is the most appropriate file type, that the image size is appropriate for how it is used on the page (as measured in pixels), and that the file size is as low as we can make it without compromising quality.
Why are Optimized Images Important?
To get to the point of this section comes down to just five letters, SEO and UX. That is search engine optimization and user experience (Why it is UX and not UE, I have no idea).
Search Engine Optimization
Search engines regularly ‘crawl’ sites and assess the site on many factors. Page load performance is one of those items, and for that determination, it takes into account images that are being downscaled (as it takes a little for the browser to do that) and file size, among several other things. Poor performance in that analysis can adversely affect your search engine result rankings.
User Experience
Did you know that based on Google’s research, the chance of bounce increased by 32% when page load time increased to three seconds, and then by 90% if the page load time increased to 5 seconds? Unoptimized images can play a huge role in slowing down site performance and impacting the experience that site visitors have.
In the case of eCommerce sites, this directly affects the bottom line. Walmart had managed to see a 2% increase in conversion rates for every one-second improvement in page load time they manage to achieve, and Amazon had calculated they’d lose $1.6 billion a year if the site speed slowed down by just 1 second.
How Do I Optimize My Images?
There are several ways you can go about starting to address this. The first involves updates to the image handling workflow. To manually process our images before upload, there are three things we have to address:
- Most appropriate file format
- Resizing of images based on use
- File size compression
You can do all of the above with dedicated image editing software like Photoshop, but below we’ll explain how we go about each step and point you to some free online tools to accomplish the task.
File Format
The first item is pretty straightforward. You’ll want to use JPG files for all cases except where transparency is needed, in which case you should use the PNG file format. Some tools will save images to PNG if there is transparency or not (looking at you, Mac screen capture). If your file is in a PNG format and doesn’t use transparency, let’s update it first.
A simple tool is https://www.iloveimg.com/convert-to-jpg, where you can drag and drop one or multiple PNG images onto the page and convert them to the lighter-weight JPG file format.

Image Pixel Size
Before uploading an image to your site, take time to assess how it will be used to determine what pixel size dimensions would be optimal. We usually operate by these three principles:
- If the image is full screen or for full-width use, it can be resized to 1920px wide (banners, product images).
- If the image is to be half the browser container width then it can be resized to 1000px wide.
- If the image doesn’t exceed a third of the content container width then it can be resized to 600px wide. (In some cases, you can go smaller by 600px wide.)
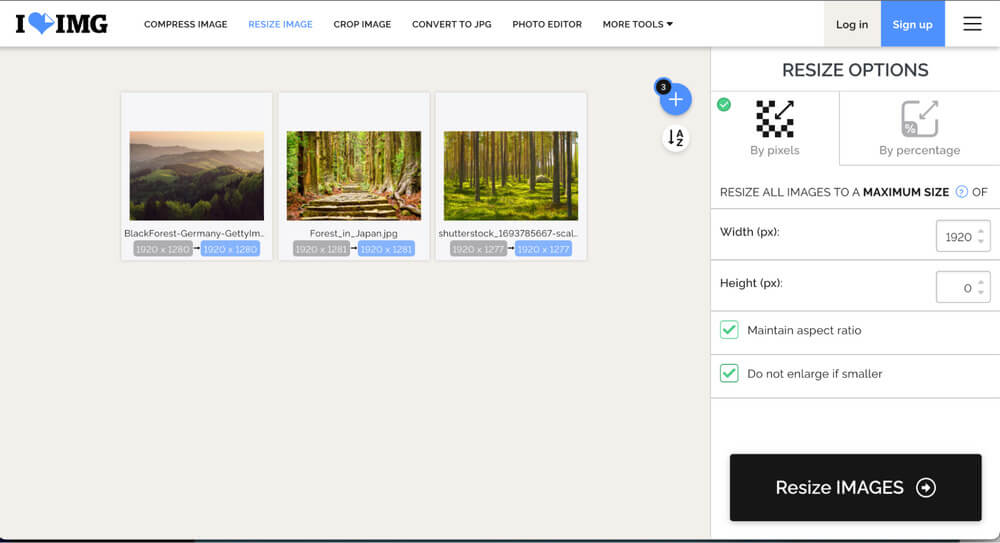
A free online tool to resize your images quickly is https://www.iloveimg.com/resize-image. You should probably group the images into different batches based on the max-width you’ll be adjusting them to. Then upload the first group of images to the tool above, select the ‘By Pixels’ tab, and define the maximum width. Keep height at 0 and the ‘maintain aspect ratio’ box checked. Click ‘Resize Images’ and then repeat the process as needed.

File Size Optimization
After you have corrected file size and resized the images as needed, it’s time to optimize them to compress their file size. Our favorite free online tool for this is https://tinypng.com/. It’s a break from the tool used for the other two steps, but we’ve found it to compress the image file size better.
With the above tool, simply drag your images onto the box at the top of the site and watch it show you how much it can save on the file size. You can then download them individually or as a group in a zip file.

WordPress Plugins
It is possible to automate this process to a certain degree using WordPress plugins. When loaded, these plugins can resize your image down to a max size limit (so not as ideal as resizing based on use case) and then optimize the file size. These plugins don’t always optimize quite as aggressively as the web tools, but it’s certainly better than nothing.
Some of our favorite image optimization plugins:
What Do I Do About the Images Already on My Site?
Some of the plugins mentioned already have bulk optimization tools to update the existing images in your media library; however, you have to look out for a couple of gotchas.
The bulk tools can’t resize images to the ideal sizes because that takes knowledge of how the image is being shown on the web pages, something the automated process won’t be able to determine. A couple of these tools allow you to set a maximum file size to resize the images that are larger than that maximum.
Bulk tools are also not always as aggressive with file optimization as manual ones. Obviously, any improvement is better than nothing, but if you’re going to put in the effort, you want the best results possible.
Additionally, and usually overlooked, is the strain that a bulk optimization can place on your server. During these bulk processes, one of two things is happening. Either the server is optimizing the images itself, a very resource-intensive process, or the plugin uploads the pictures from your site to a third-party service to be processed and then re-downloading them when completed (all in the background). When entire media libraries are updated, they can place a considerable load on your server. We’ve seen cases where this action all but takes the site offline.
Once aware of the above, if you still choose to go forward, great, as you are making improvements to your site that will benefit your business. If you don’t have the time to make these optimizations yourself or are concerned about the server load impact mentioned above, we’d love to help.
Our Development and Design teams have processes to avoid the server load pitfall. We’ve done mass image optimizations on dozens of sites. On one recent mass optimization for a large eCommerce client, we managed to shave 20GB off the full library file size. Not only did that allow for better page load speed and improved user experience, but it also reduced the strain on their hosting servers and helped them avoid having to upgrade their hosting account. We’d love to bring some of those improvements to your site as well!


